# Move an IPFS installation
This page walks through how to move your IPFS installation from one system to another. This process is cross-platform compatible and is especially useful for readers who are changing operating systems. However, the process is different for CLI and IPFS Desktop users.
# Command-line
The process is to grab the .ipfs folder from the home directory of the donor system, and copy it over to home directory on the receiving system.
This process is not a backup procedure; do not treat it as such. Many things can go wrong with this process, most of which relate to peer IDs. Since we are duplicating an .ipfs installation folder, both IPFS peers have the same peer ID. This issue is ok as long as you delete the old donor installation once the copy is complete. Never start two peers with the same peer IDs on different places, as they will misbehave.
# Move installation
The easiest way to move your IPFS installation is to grab the .ipfs folder, and move it to another destination.
# Linux and MacOS
Stop any IPFS daemons, services, or applications that are currently running.
In a terminal, move to where your IPFS repository is stored. This is likely your home folder:
cd ~/Make a copy of the
.ipfsdirectory:cp --recursive --verbose $([[ -z $(cp --help | grep "\-\-reflink" | head -n1) ]] || echo -n "--reflink=auto") .ipfs ipfs-backupThis will output something like:
'.ipfs' -> 'ipfs-backup'
'.ipfs/datastore_spec' -> 'ipfs-backup/data'
...
The above command checks whether the current operating system supports the
cp --reflinkcommand. If it does, like in most Linux operating systems, then this command will use the--reflinkargument when calling thecpprogram. If the operating system does not support the--reflinkargument, like MacOS, then it will not use that argument.You now have a copy of your IPFS repository within the
ipfs-backupfolder.
# Windows
- Stop any IPFS daemons, services, or applications that are currently running.
- Open the file explorer and go to
C:\Users\YOUR USERNAME, replacing YOUR USERNAME with your current Windows username. - Select the View tab at the top of the file explorer window and check the Hidden items checkbox.
- Find the
.ipfswithin your user's home folder. This is usuallyC:\Users\YOUR_USERNAME\.ipfs. - Copy this folder to somewhere convenient like the
Desktopand rename it toipfs-backup.
# Restore installation
Once you have a backup of your IPFS repository in ipfs-backup, you can move it to the location you want to restore to. Once there, you can restore your IPFS repository.
# Linux and macOS
Stop any IPFS daemons, services, or applications that are currently running.
In a terminal, move to where your IPFS repository is stored. This is likely your home
~folder:cd ~/Move your current IPFS repository to another folder. If something goes wrong you can restore your installation from here:
mv .ipfs ~/ipfs-oldMove your backup IPFS repository to
.ipfs:mv ipfs-backup ~/.ipfsStart an IPFS daemon:
ipfs daemonYour IPFS daemon should continue where it left off.
Once you have confirmed that everything is working as normal, you can delete your temporary
ipfs-oldbackup:rm -rf .ipfs-old
# Windows
- If restoring to the IPFS Desktop application, open the application at least once before attempting to restore anything.
- Stop any IPFS daemons, services, or applications that are currently running.
- Open the file explorer and go to
C:\Users\YOUR_USERNAME. - Select the View tab at the top of the file explorer window, and check the Hidden items checkbox.
- Find the
.ipfswithin your user's home folder. The full address is usually something likeC:\Users\YOUR_USERNAME\.ipfs. - Rename the
.ipfsfolder toipfs-old. We can restore fromipfs-oldif anything goes wrong. - Copy your
ipfs-backupIPFS repository into your user's home folder and rename it to.ipfs. - Open the IPFS Desktop application or run
ipfs daemonwith Powershell. Everything should start, and your IPFS repository should restore normally.
# Windows Subsystem for Linux
If you have IPFS installed in the Windows Subsystem for Linux, you can move your IPFS repository from Linux into your Windows environment. This process overwrites the IPFS repository in Windows.
On Windows, open the IPFS Desktop application or run an
ipfs daemon. Do this at least once.Stop any IPFS daemons, services, or applications from running in your Linux and Windows environments.
Copy your Linux IPFS repository to Windows. This process overwrites the IPFS repository in Windows:
cp --recursive --verbose ~/.ipfs /mnt/c/Users/Your Username/On Windows, open the IPFS Desktop application or run an
ipfs daemon. Everything should open successfully.
# IPFS Desktop
Follow these steps to move your IPFS installation using the IPFS Desktop application.
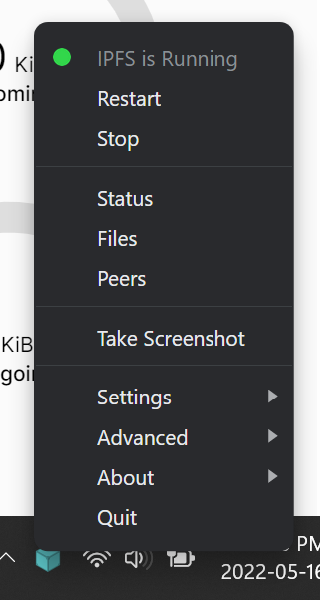
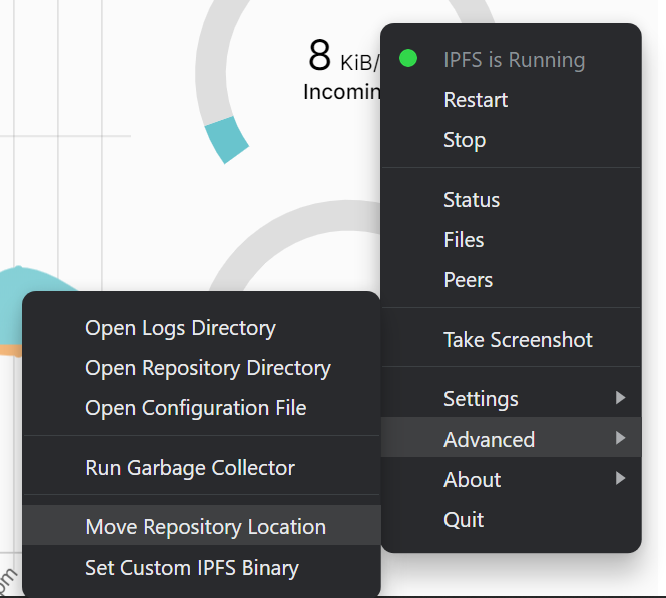
Select the IPFS Desktop tray menu.
Linux MacOS Windows 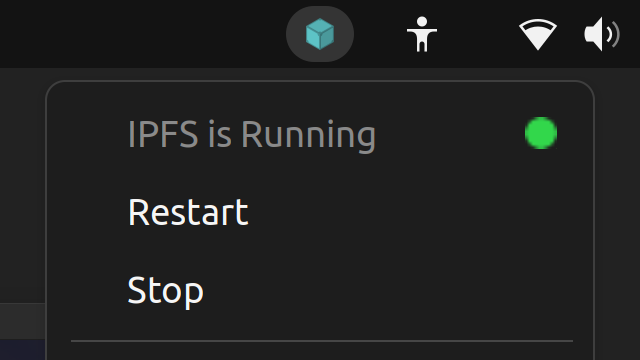

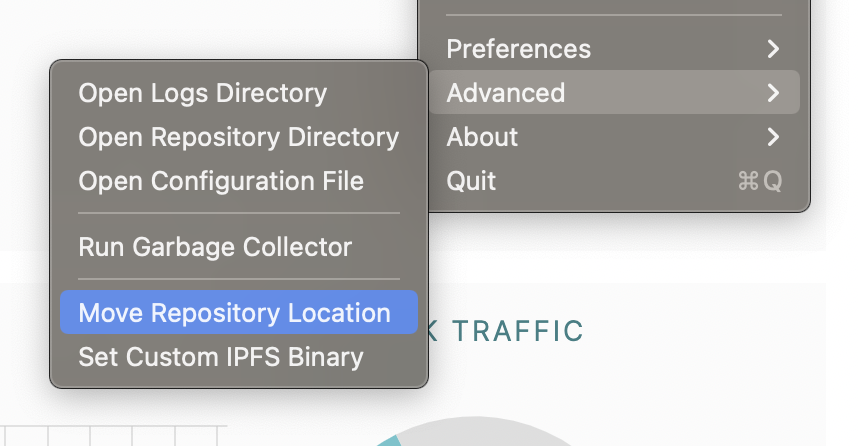
Select Advanced → Move Repository Location.
Linux MacOS Windows 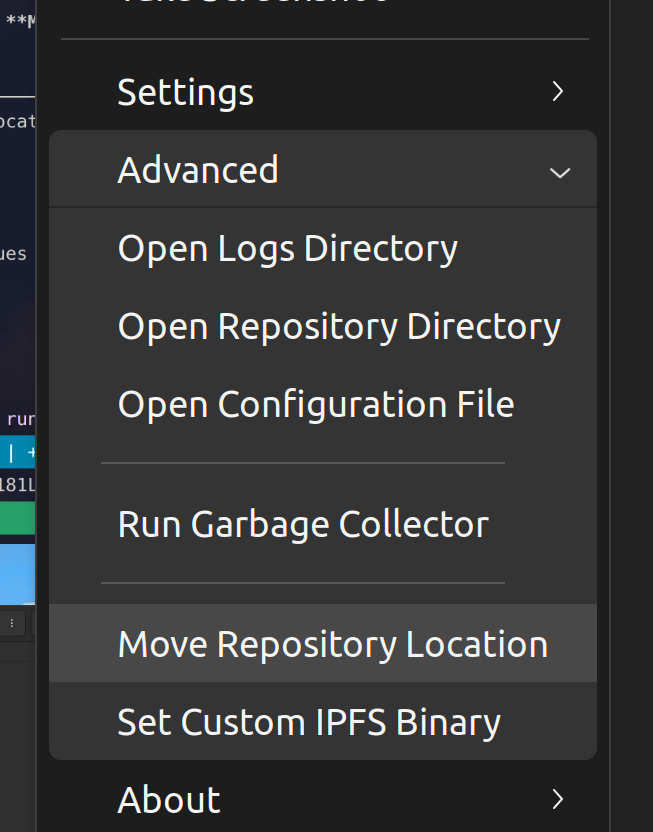
Choose your new IPFS location within the file browser.
IPFS will stop, move your repository to the new location, and the start up again. If you have a repository larger than 1 GiB it may take a few moments to move it to the new location.
# Symlink
A different approach to moving your IPFS repository is to simply create a symlink in the original location that points to the new location. This way, no configuration has to be changed, so tools and apps like IPFS Desktop will work normally.
# Linux and MacOS
Unix-based operating systems can use the ln -s command to create a symbolic link:
ln -s ~/.ipfs ~/new-ipfs-repo
# Windows
Windows users can use the mklink command to create a symbolic link. This command is available within command-prompt or PowerShell:
mklink "C:\New IPFS Repo" "C:\Windows\Users\YOUR_USERNAME\.ipfs\"
Make sure to replace YOUR_USERNAME with the name of the user you are currently logged in as.
# Troubleshooting
Here are some common issues you might run into when moving your IPFS installation.
# Linux and macOS
# IPFS daemon doesn't run successfully
If ipfs daemon doesn't run successfully then you can restore your old IPFS repository, assuming you made a copy:
mv .ipfs ipfs-backup-broken
mv .ipfs-old .ipfs
Running ipfs daemon now loads your old IPFS repository. Try repeating the backup and restore steps. Make sure to stop any IPFS services, daemons, or applications when backing up and restoring an IPFS repository.
# Some data from the old installation is missing on the new one
If you've previously run some ipfs commands with sudo, for example, sudo ipfs get $someCID, the ipfs command may have created a new IPFS repository for the root user, separate from the one for your user account.
If you have root / sudo access to the old system, check to see if the directory /root/.ipfs exists. If so, make a backup of the /root/.ipfs directory, as described above.
If you want to consolidate the two repositories, you can export the IPFS objects from one repository to a set of CAR files and import them into a different repository.
Below is a small bash snippet to export all local IPFS objects to a set of files in a directory called car_export. These commands should be run as the user who owns the repository you want to export, and the ipfs daemon should be running.
mkdir -p car_export
cd car_export
cids=$(ipfs refs local)
for cid in $cids; do
  echo "exporting $cid"
  ipfs dag export $cid > $cid.car
done
You should then be able to import those files into a new IPFS installation using a command like this:
cd car_export
ipfs dag import *.car
# Windows
# IPFS Desktop has an error
Make sure to open the IPFS Desktop application at least once before attempting to move any IPFS repositories. The IPFS Desktop relies upon another directory called .ipfs-desktop. The migration sometimes fails if this folder does not exist.
# IPFS Desktop won't open
In your user's home folder, rename .ipfs and .ipfs-desktop to ipfs-broken and ipfs-desktop-broken respectively. Open the IPFS Desktop application; this creates new .ipfs and .ipfs-desktop folders. Close the IPFS desktop application and replace .ipfs with ipfs-broken. If the IPFS desktop application opens, then you now know that the original .ipfs-desktop folder was the issue. If the IPFS desktop application doesn't open, then the original .ipfs folder may be the issue. If both original folders are causing issues, you may have a corrupted database. If this is the case, post your issue on the IPFS forums (opens new window).