# Deploy static apps to IPFS with GitHub Actions
This guide will walk you through the process of configuring a GitHub Actions (opens new window) workflow to deploy a repository containing a static site or app to IPFS using the IPFS Deploy Action (opens new window).
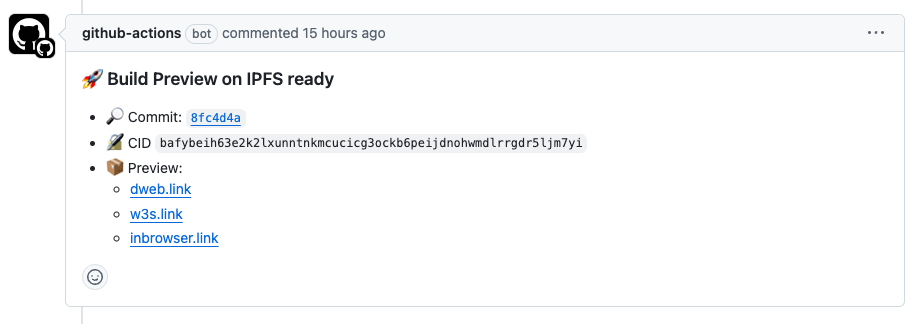
By the end of this guide, your web app (or just a static website) will be deployed to IPFS automatically when you push to your repository. It will also deploy pull request previews for each commit, and provide some other developer experience features, like commit status updates with the CID of the build, and a comment on pull requests with the IPFS CID and preview links.
Once deployed, each deployment of your app will be addressed by a CID and accessible via recursive gateways (opens new window), as well as the Service Worker Gateway (opens new window).
To see what this looks like in a real-world example, check out the IPNS Inspector (opens new window).
# What is the IPFS Deploy Action?
The IPFS Deploy Action (opens new window) is a composite action (opens new window), that can be called as a step in a GitHub Actions workflow (opens new window), and combines the following features:
- 📦 Merkleizes your static site into a CAR file
- 🚀 Uploads CAR file to either Storacha (opens new window), IPFS Cluster (opens new window), or Kubo (opens new window)
- 📍 Optional CID pinning to Pinata (opens new window)
- 💾 Optional CAR file upload to Filebase (opens new window)
- 💬 PR Previews, with a comment containing the CID and preview links
- ✅ Commit Status updates
The IPFS Deploy Action works with both self-hosted IPFS nodes (Kubo or IPFS Cluster) and pinning services (Storacha, Pinata, Filebase) and was built based on the best practices in 2025.
The IPFS Deploy Action makes no assumptions about your build process. Whether you're using React, Vuepress, Astro, Next.js, or any other static site generator, this guide will help you get your web application deployed on IPFS. The only requirement is that your web application is static, meaning that once built, it is a folder containing HTML, CSS, and JavaScript files that are served as-is to the client.
Note the IPFS Deploy Action is built on top of the following CLIs:
- Kubo CLI (opens new window) for merkleizing builds with UnixFS, uploading CAR files to Kubo, and interacting with Pinning APIs
- IPFS Cluster CTL (opens new window) for IPFS Cluster uploads
- w3cli (opens new window) for Storacha uploads
- AWS S3 CLI (opens new window) for Filebase CAR uploads
# Prerequisites
Before you begin, make sure you have:
- A GitHub repository with your static web application, this can be a single page application, or multi-page application (like Next.js) that requires no special server-side rendering or backend logic.
- A Storacha (opens new window) account or an IPFS Node (Kubo (opens new window) or IPFS Cluster (opens new window)) with the Kubo RPC endpoint publicly reachable (see this guide for instructions on how to secure the Kubo RPC endpoint with TLS and authentication)
This guide will use Storacha for simplicity. If you have an IPFS Node, you can skip the Storacha setup and use your own node instead.
# Step 1: Setting Up Storacha
If you don't have a Storacha account, you can create one at storacha.network (opens new window).
Install the
w3cli(opens new window) tool:npm install -g @web3-storage/w3cliLogin to your Storacha account:
w3 loginCreate a new space for your deployments:
w3 space create my-app-spaceCreate a signing key:
$ w3 key create --json
{
  "did": "did:key:YOUR_KEY_DID",
  "key": "STORACHA_KEY"
}
Save the key value as a GitHub secret named
STORACHA_KEYCreate a UCAN (opens new window) proof. Note that the command will create a UCAN proof allowing uploads to the space created in step 3:
w3 delegation create did:key:YOUR_KEY_DID -c space/blob/add -c space/index/add -c filecoin/offer -c upload/add --base64Save the output as a GitHub secret named
STORACHA_PROOF
# Step 2: Configure Your Workflow
Create a new file .github/workflows/deploy.yml in your repository:
name: Deploy to IPFS

permissions:
  contents: read
  pull-requests: write
  statuses: write

on:
  push:
    branches:
      - main
  pull_request:

jobs:
  deploy:
    runs-on: ubuntu-latest
    steps:
      - name: Checkout code
        uses: actions/checkout@v4

      - name: Setup Node.js
        uses: actions/setup-node@v4
        with:
          node-version: 'lts/*'
          cache: 'npm'

      - name: Install dependencies
        run: npm ci

      - name: Build project
        run: npm run build

      - name: Deploy to IPFS
        uses: ipshipyard/ipfs-deploy-action@v1
        id: deploy
        with:
          path-to-deploy: dist # Change this to your build output directory
          storacha-key: ${{ secrets.STORACHA_KEY }}
          storacha-proof: ${{ secrets.STORACHA_PROOF }}
          github-token: ${{ github.token }}
A couple of things to note:
- This workflow assumes that your build command is
npm run build. If your build command is different, you can change theruncommand in the build step. - The
path-to-deployinput is set todistby default. If your build output directory is different, you can change thepath-to-deployinput.
# Step 3: Optional Configurations
# Uploading the CAR file to a Kubo Node
To upload the CAR file to a Kubo node instead of or in addition to Storacha:
- Get your Kubo RPC endpoint (opens new window) and API token (opens new window)
- Add them as GitHub secrets (opens new window) named
KUBO_API_URLandKUBO_API_AUTH - Add these lines to your workflow:
- name: Deploy to IPFS
  uses: ipshipyard/ipfs-deploy-action@v1
  with:
    # ... other inputs ...
    kubo-api-url: ${{ secrets.KUBO_API_URL }}
    kubo-api-auth: ${{ secrets.KUBO_API_AUTH }}
You can also customize the Kubo version and ipfs add parameters (opens new window) used for merkleizing your content:
- name: Deploy to IPFS
  uses: ipshipyard/ipfs-deploy-action@v1
  with:
    # ... other inputs ...
    kubo-version: 'v0.40.1' # Default, change if needed
    ipfs-add-options: '--cid-version 1 --chunker size-1048576' # Default options
# Using IPFS Cluster
To upload the CAR file to an IPFS Cluster:
- Get your IPFS Cluster CTL (opens new window) endpoint, username, and password
- Add them as GitHub secrets
- Add these lines to your workflow:
- name: Deploy to IPFS
  uses: ipshipyard/ipfs-deploy-action@v1
  with:
    # ... other inputs ...
    cluster-url: ${{ secrets.CLUSTER_URL }}
    cluster-user: ${{ secrets.CLUSTER_USER }}
    cluster-password: ${{ secrets.CLUSTER_PASSWORD }}
You can also configure additional IPFS Cluster options:
- name: Deploy to IPFS
  uses: ipshipyard/ipfs-deploy-action@v1
  with:
    # ... other inputs ...
    cluster-retry-attempts: '5' # Override number of retry attempts
    cluster-timeout-minutes: '15' # Override timeout in minutes per attempt
    ipfs-cluster-ctl-version: 'v1.1.5' # Default version
    cluster-pin-expire-in: '720h' # Optional: Set pin to expire after time period (e.g., 30 days)
# Pinning with Pinata
This works by sending a request to the Pinning API (opens new window) with the CID of the deployment, and Pinata handles pinning in the background.
To pin your content to Pinata:
- Get your Pinata JWT token (opens new window) from the Pinata dashboard
- Add it as a GitHub secret named
PINATA_JWT - Add these lines to your workflow:
- name: Deploy to IPFS
  uses: ipshipyard/ipfs-deploy-action@v1
  with:
    # ... other inputs ...
    pinata-jwt-token: ${{ secrets.PINATA_JWT_TOKEN }}
    pinata-pinning-url: 'https://api.pinata.cloud/psa' # Default URL
# Adding Filebase Storage
Note that Filebase only supports static websites for paid accounts. To store CAR files on Filebase:
- Create a Filebase account (opens new window) and bucket (opens new window)
- Get your access and secret keys
- Add them as GitHub secrets
- Add these lines to your workflow:
- name: Deploy to IPFS
  uses: ipshipyard/ipfs-deploy-action@v1
  with:
    # ... other inputs ...
    filebase-bucket: 'your-bucket-name'
    filebase-access-key: ${{ secrets.FILEBASE_ACCESS_KEY }}
    filebase-secret-key: ${{ secrets.FILEBASE_SECRET_KEY }}
# Accessing Your Deployed Site
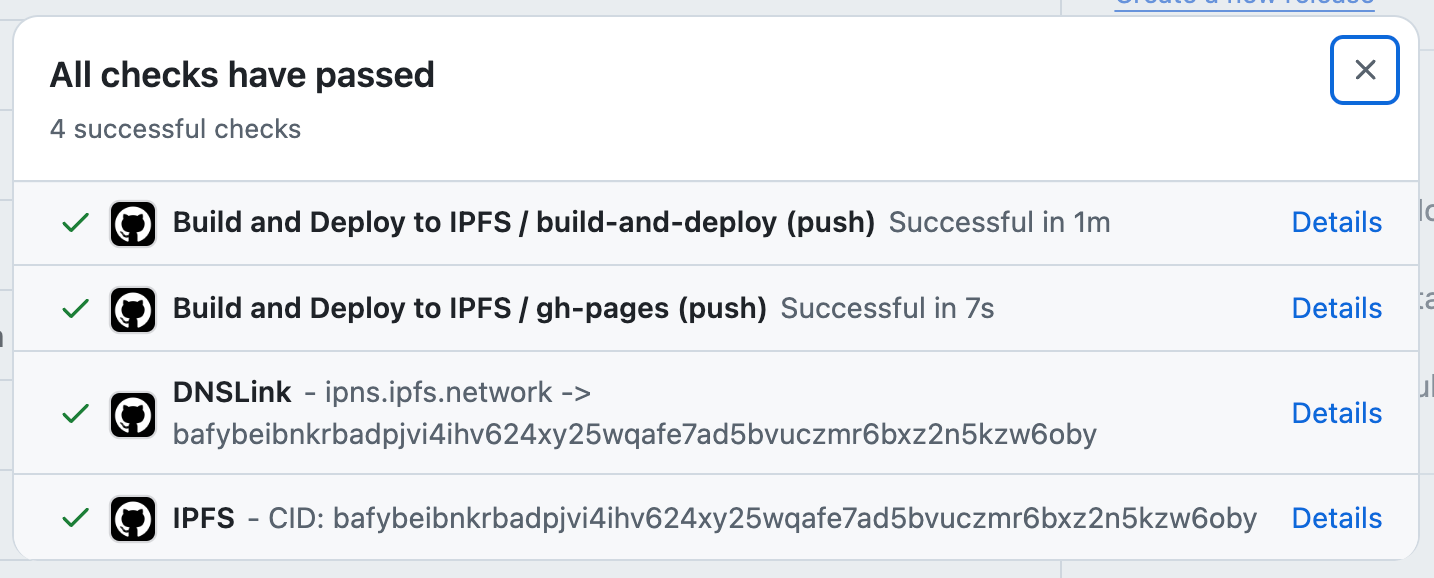
After successful deployment, you can find the CID for commits:
- In the GitHub Actions run output, which will contain the IPFS CID
- In the PR comments (if deploying from a PR)
- In the commit status checks
For example, here's where you can find the CID for a given commit on GitHub:
You can load the app using the CID from the commit status, and it will be accessible through:
- Public Good Gateway:
https://<CID>.ipfs.dweb.link - Service Worker Gateway (opens new window):
https://<CID>.ipfs.inbrowser.link - Storacha Gateway (opens new window) (if using Storacha):
https://<CID>.ipfs.w3s.link.
# With IPFS Desktop or Kubo
If you have IPFS Desktop or Kubo installed, you can load with the local gateway exposed by IPFS Desktop or Kubo.
For example, here's the URL for a given CID: http://bafybeicbpllqfrjfygcdwkz2q5prdtu4q7obmsqr2fkk5byn45rs24ypcu.ipfs.localhost:8080
This URL uses subdomain resolution (where the CID has its own subdomain), which ensures origin isolation per CID.
# Troubleshooting
Build Output Directory Not Found
- Double-check the
path-to-deploymatches your build output directory - Ensure your build command is completing successfully
- Double-check the
Authentication Issues
- Verify your credentials are correctly set in GitHub secrets
- Check that the secrets are properly referenced in the workflow file
- For Storacha, ensure both the key and proof are provided
- For IPFS Cluster, ensure URL, username, and password are all provided
- For Kubo, ensure both API URL and auth are provided
Workflow Permission Issues
- Ensure the
permissionsblock is included in your workflow - Check that your GitHub token has the necessary permissions
- Ensure the
# Best Practices
- Always use a specific version of the action (e.g.,
@v1) - Consider using multiple IPFS providers for redundancy
- Use environment-specific configurations when needed
# Next Steps
After deploying your site to IPFS, you may want to:
- Add a custom domain: Use DNSLink to automatically update DNS records so users can access your site via a human-readable domain name like
yourdomain.cominstead of a CID. - Set up a DNSLink gateway: If you want to serve your site directly from your own domain over HTTPS, see Setup a DNSLink Gateway.
- Learn about custom domains: For an overview of domain options, see Custom domains and DNSLink.
# Getting Help
If you encounter any issues:
- Check the GitHub Actions run logs for detailed error messages
- Review the action's README (opens new window) for updates
- Open an issue in the action's repository (opens new window) with detailed information about your setup and the problem you're experiencing